

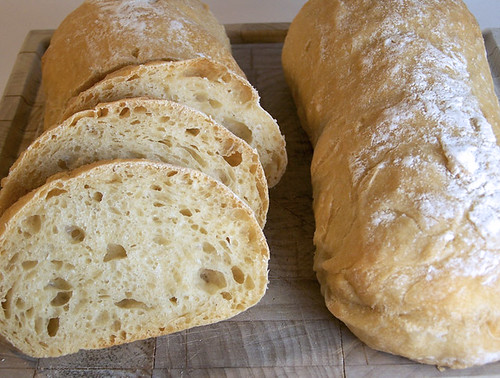
The seventh recipe for The Bread Baker’s Apprentice Challenge was Ciabatta. This was one I was really excited about attempting but also pretty apprehensive. It’s probably one of the most complicated breads we’ve done so far and from surveying other BBAers on twitter and the forum it was pretty apparent that “results may vary”. Good Ciabatta is full of big giant holes and that involves having a very wet dough, which you can imagine, is hard to work with. In addition to working with the very wet dough for the first time, making this bread involves some special tools as well as setting up your oven in a very specific way, so there’s quite a bit of prep involved.
There were two different versions, using different kinds of pre-ferments: poolish or biga. These are just mixtures of bread, water and yeast that sit out for a certain amount of time to develop flavor and texture. Later you add the rest of ingredients to make the final dough. I chose the biga because the consensus seemed to be that it resulted in bread with bigger holes. I also switched bread flour for regular AP flour as I read several accounts saying they got better results that way as well.

I honestly thought I screwed the bread up several times. First I let the biga ferment for way too long (it was supposed to be 2-4 hours, I accidentally let it go past 6). Then the next day I measured out all the ingredients for the poolish formula instead of the biga formula, though luckily I caught myself before doing too much damage. When I finally mixed everything up correctly, I added the maximum amount of water called for to create a very watery, sticky dough. It seemed like it would be really hard to handle, but I didn’t find it that difficult. It was sticky but it still stayed together for the most part. I laid it out on a very floured surface and proceeded with stretching the dough out and then folding it over on itself. You do this several times and I actually added a few more as again, my research had said it produced better results. Then I used my homemade couche which was just a bunch of large cotton cloths I had gotten at Target and sprinkled well with flour. I divided the dough in three and placed them on the cloth and bunched it up around the sides of each piece to give the dough support so it wouldn’t spread out while it proofed. Ciabatta means slipper, so that’s the shape I was are going for.
This is the first recipe from the book that involved special preparation of my oven to make it behave more like a real hearth. I already bought a baking stone a few months ago and this was the second time I used it after a disastrous first time, trying to bake a pizza and putting too much cornmeal on the stone (which the directions told me to do) which burned up and starting smoking in the 500 degree oven. I was careful not repeat that again. But in being fearful that would happen again, I really didn’t put enough cornmeal on the pan I used to transfer the loaves from the couche to the oven. You have to be very gentle in handling those loaves or all the gas will come out and you lose your big holes. One of my loaves definitely deflated a lot because I had a hard time transferring it. I think next time, I’ll try lightly oiling the pan instead of putting cornmeal on it. Hopefully that will help them slide off easier.
Beside the stone, I also needed to have a pan in the oven. Right after the bread went in I added hot water to the pan to create a big burst of steam. After that I used a spray bottle to spray water into the sides of the oven at 30 second intervals to create even more steam bursts. The whole thing sounded really complicated when I was reading the instructions beforehand, but actually doing it wasn’t so bad.


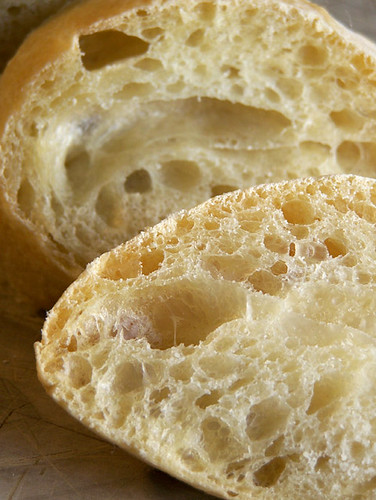
As you can see from the pics, I did wind up getting some fairly large holes in my loaves. Nothing like the pic in the book and there were still parts of the loaves that had tight crumb (which I think was all due to degassing in the transfer to the oven), but I’m very happy with my first try. It turned out a lot better than I thought it would. All-in-all, Ciabatta was to easier to make than I was expecting after first reading through the instructions but it’s definitely not a simple bread to make. I’m glad we had the six other breads to prepare us for this one! I can’t imagine that I’ll be making it regularly, but it did come out tasting great (It was a little sour almost like sourdough and I’m not sure if that’s because I had accidentally let the biga ferment for so long or if it’s just supposed to taste that way?), so I’m definitely going to be making it again, if only to try for bigger holes!

Wow, these have to be the MOST delicious looking ciabatta yet! AWESOME!
Perfect crust. Perfect crust. Perfect photos. 🙂
Great job. Nice baking along with you,
Susie
.-= Susie´s last blog ..Bread Baker’s Apprentice: CHALLENGE #14 French Bread =-.
Wow, yours turned out perfect!! Great job!
Wow! Your ciabatta is very impressive and looks so yummy. Well done!