

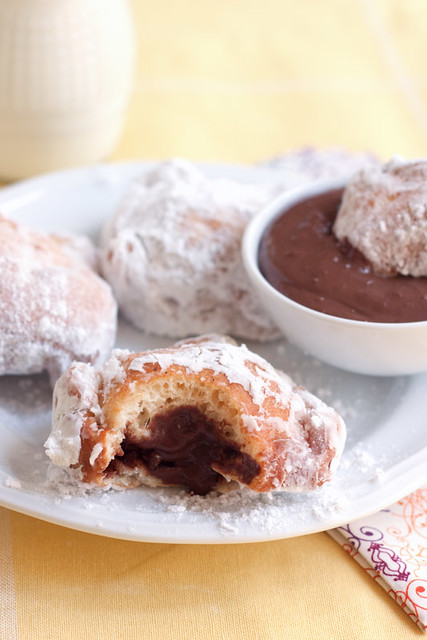
I meant to post this recipe yesterday since it was Mardi Gras and beignets are pretty synonymous with New Orleans. Better late than never, right? I grew up on the Mississippi gulf coast (where they also celebrate Mardi Gras) and have spent some time in New Orleans so I know what a good beignet tastes like and this recipe is pretty perfect, but I put my own spin on it by adding some chocolate in middle. Why? I don’t know. Is “because it sounded like it would be awesome” a good enough answer for you? Because it really did (And guess what? It really is!)
But let’s back up a bit. It’s possible some of you may not know what a beignet is, maybe you’re not even sure how to pronounce it. It’s very simple, actually: it’s a donut, covered in lots of powdered sugar. And it’s pronounced benYAY. You will really want to emphasize that “Yay” because eating these will make you a very happy person. A beignet is sort of the lazy man’s donut. I can just imagine some old french baker going “I have to cut this stupid dough into circles and then cut a hole in the middle. Screw that! Squares are easier!” (Or maybe it was the other way around and someone thought squares were boring and decided to make circles? Whatever, you get my point.) I’ve made my own donuts before and these are easier to make and just as satisfying.

Of course I had to make things more complicated by adding the chocolate. Sorry, I couldn’t help it. So with this recipe you get three choices depending on how adventurous you’re feeling:
- Original beignets in all their powdered sugar glory.
- Original beignets with a warm chocolate sauce to dip them in.
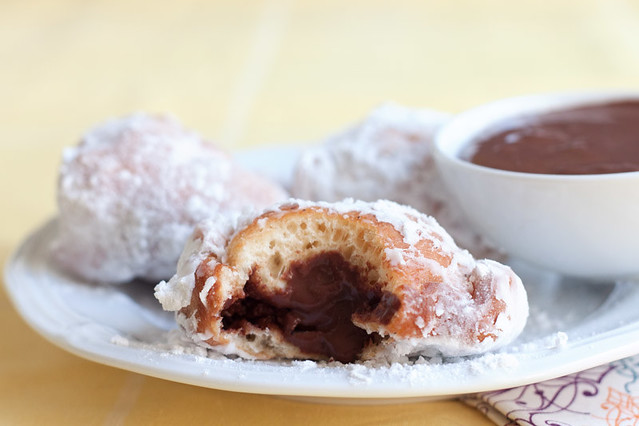
- Beignets with chocolate in the middle and more chocolate to dip them in.
Or you can do what I did and have all three. I divided the dough in two and made original beignets out of one half and chocolate-filled beignets out of the other. There was lots of filling leftover, so I used it as a dipping sauce. And the sauce tastes really good on its own, almost like a thicker hot chocolate or a not quite thick pudding, so you can actually get a whole other dessert out of this if you want to stretch it.
Now lets talk about the elephant in the room: frying. Are you scared? I used to be so scared of frying things! And I KNOW it’s not healthy, but sometimes you just have to let go and eat fried things because they are delicious and there is no use fighting that. Treating yourself every once in a while is not going to kill you, in fact, it will probably make you a happier person. And frying is not difficult at all. It’s one of the easiest cooking methods there is: heat up oil, add food, fry. Done. Beignets take two minutes to make. TWO MINUTES. How many things can you cook in the oven for two minutes and actually be edible? Frying is nothing short of magic really. Don’t be scared of it! I’m not saying you should go out and buy a Frydaddy or anything crazy like that, but once you accept frying into your life (in moderation!) it will open up a whole new world of delicacies for you.
There was some trial and error involved in the chocolate-filled beignets since I wanted to use my tried and true beignet recipe and combine it with the filling from a different recipe, but ultimately I got it worked out and they turned out well. You just put a spoonful of the filling between two pieces of dough and fry like normal. The main thing you should be careful about is to make sure that those two pieces of dough are thoroughly pinched and folded together. Otherwise, they will pop open when you fry them! Un désastre. But it’s a recoverable disaster, so don’t panic or let that stop you from trying. You may look at the recipe and be intimidated because it’s pretty long, but that’s just because I was really detailed and added in lots of notes to help. The actual recipe is not difficult and I promise you will happy you tried these once you take that first bite into a warm, fluffy beignet.


Chocolate-filled Beignets with Chocolate Dipping Sauce
Beignets adapted from Paula Deen, filling adapted from Joy Jessup
Ingredients
- 1 envelope (2 1/4 tsp.) active dry yeast (I used rapid-rise yeast)
- 1/2 cup sugar
- 1 1/2 cups lukewarm water
- 2 eggs, slightly beaten
- 1 1/4 tsp. salt
- 1 cup evaporated milk
- 7 cups bread flour
- 1/4 cup shortening or butter
- Oil, for deep-frying (I like peanut or canola)
- 3 cups powdered sugar
Filling
- 6 tbsp. butter, cut into small pieces
- 12 oz. good-quality bittersweet chocolate, chopped
- 1 1/2 cups half and half
Process
Mix the Dough: Mix the yeast, sugar, and water in a large mixer bowl. Let sit for 10 minutes.
You don't need a stand mixer to make this recipe, but it will make things easier. Start with the standard paddle hook, but you'll need the dough hook later.
In another bowl, beat together eggs, salt, and evaporated milk. Pour egg mixture into the yeast mixture and stir well.
Add 3 cups of flour and mix on low or stir until combined. Add shortening or butter and continue adding the remaining 4 cups of flour slowly until it's all incorporated. The dough will be sticky.
Knead the dough and let it rise: At this point, you can switch your mixer to the dough hook and beat on medium, adding more flour about a tablespoon at a time until the dough pulls away from the sides and forms a smooth ball (about 4-6 minutes). If you don't have a mixer or would rather knead, place the dough on a floured surface and knead until smooth, adding a little more flour as needed (about 8-10 minutes). The dough may still be a bit sticky, but shouldn't be overly so.
Spray a bowl with cooking spray and place the dough inside. If the bowl doesn't have a cover, lightly place some plastic wrap on top. Let rise for 2 hours in a warm spot. I like to turn my oven on to the lowest temperature for about a minute and then immediately turn it off again. Then I place the bowl in the warm oven.
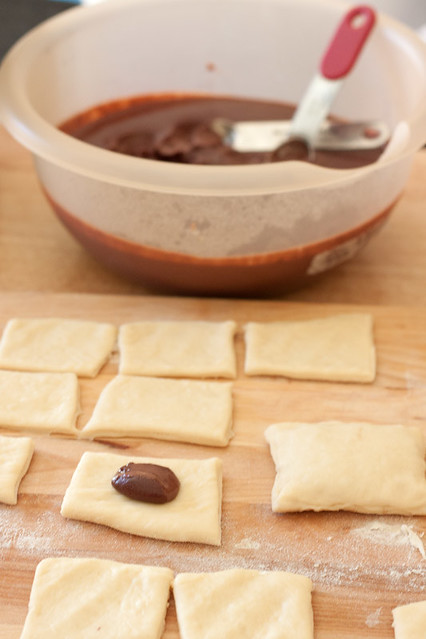
Make the Filling/Dipping sauce: In a saucepan over low heat, mix together butter, chocolate, and half and half. Stir frequently until all the chocolate and butter are melted and the mixture is smooth. Remove from heat. Pour into a bowl and cover.
For filling: place in the freezer to harden.
For dipping sauce: either store in the fridge or let sit out until beignets are ready. Warm it back up on the stove or in the microwave.
Heat up the oil: When the dough has risen, place a deep pot like a dutch oven on the stove and add enough oil to fill the pot about 1 to 1 1/2 inches deep. If you are making filled beignets, you may want to skip ahead and start making them before you heat up the oil. They take longer to prepare and it's really important to watch your oil to make sure it doesn't overheat.
Turn the burner to medium and heat the oil to 350 degrees. I would recommend using an instant-read thermometer so you know the exact temperature at all times. It will take about 10-15 minutes to heat up. If you don't have a thermometer, you'll know it's ready when you sprinkle some flour in the pot and it sizzles. If it gets hotter than 350 or starts smoking, remove the pot from the burner immediately and let it cool down to the correct temperature.
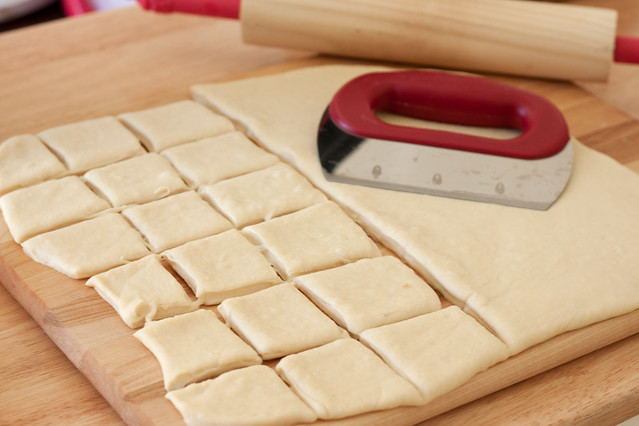
Shape the dough: While the oil is heating up, place the dough on a lightly floured surface and roll out into a square or rectangle:
For plain beignets: roll to 1/4 inch thick. Use a knife or pastry cutter to cut into 2x2 inch squares.
For filled beignets: roll to 1/8 inch thick. Use a knife or pastry cutter to cut into 3x3 inch squares.
Add the Filling: Remove your filling from the freezer. Scoop out a heaping 1/2 tsp. and place in the middle of the square. Gently place another square on top and pinch the sides together. Fold each side in about 1/4 inch and pinch again. It is VERY important that the beignet is well sealed. If not, it could pop open while it fries and all the filling will spill out!

Your mantra: pinch and fold, pinch and foldIf your beignet pops open during frying and filling starts to pour out, don't panic! If it's almost done frying you can leave it in there for a few more seconds, but otherwise, remove it. You can keep on frying even with chocolate bits in there. They will just burn up and settle down in the bottom of the pot.

Oops! This is what happens if you don't pinch the dough together very well.Fry the dough: Set several layers of paper towels near your pot. Fill a paper or plastic bag with powdered sugar and place that near the paper towels.
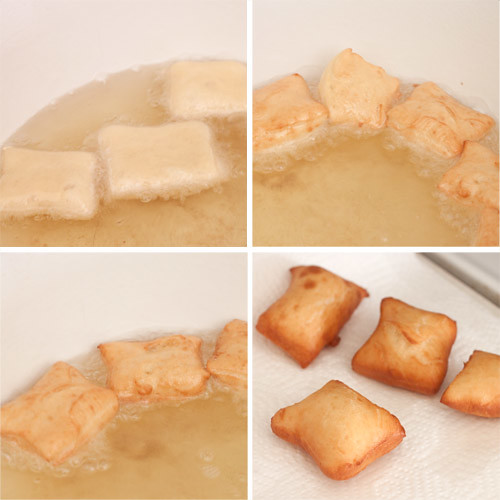
When the oil is at the correct temperature, add a dough square, one a time, to the pot with a slotted spoon. Fry 4-6 at a time depending on the size of your pot. Be careful: if you add too many at once or you may wind up burning them. Use the slotted spoon to flip them over every 30 seconds. Fry for 2-3 minutes or until golden brown on both sides. If they are taking longer than 3 minutes to brown you need to turn your burner up and make sure your oil is at the correct temperature. Remove with slotted spoon and place on paper towels to drain.
Let cool for a minute and then transfer to the bag of sugar. Hold the bag closed and toss to coat.
Repeat with remaining squares.
Recipe Notes
This recipe makes A LOT. Unless you have a family of 10 you may want to half it, which is what I always do. I’ve even quartered the recipe before and it came out fine.
Beignets are best when they're still warm, but they're still good at room temperature. They're also best the day you make them, but can be stored in a sealed plastic bag and eaten later. The dipping sauce is best served warm, but it's not bad chilled either. It should be stored in the fridge.
Make ahead of time: You can start making these the night before. Do everything up to rolling out and cutting up the dough. Place the squares on a parchment-lined baking sheet and cover with plastic wrap. Place in the fridge overnight. You could also freeze the squares and take out a few at a time whenever you want a beignet!
Take the squares out the next day and let them come to room temperature (about 30 minutes) and then proceed with heating the oil and frying them.

OMG. I can’t accept frying into my life because then I would eat nothing but donuts and french fries for every meal. How about your just mail me one of the chocolate filled beignets instead? Don’t forget the chocolate dipping sauce!
Come over to the dark side with me! I thought this would be recipe to finally get you to try frying since it has chocolate in it. Come on, you know you want to try these! 🙂
I have to admit I’ve been scared of frying things too! And not only because it’s bad for you–but mainly because I always thought it was too hard and/or messy. But I’m going to rethink that motto because these look AMAZING. Thanks for sharing!
This looks tasty and yummy and I loved fried dough!
WANT https://backtothecuttingboard.com/breakfast/chocolate-filled-beignets/
Oh Lordy this look so good.
If I were hypothetically a lazy person and wanted to use pre-made dough, what do you think would hypothetically work best (if at all)– biscuit or pastry dough? Hypothetically, of course.
LOL, well I think biscuit dough probably wouldn’t work because of the baking powder/soda in it? But pastry dough might work as long as it has similar ingredients. But it only take about 15 minutes to mix up this dough, so I swear it’s not hard to do. If you have a mixer, you can do all the work with that so you don’t even have to touch it!
These look absolutely heavenly!
OMG! Yes, please! Those look utterly addictive, and they are so cute, too!
Yum! Way to make an evil fried food even more evil. 🙂
Wow, these look incredible. My mouth is watering. Beautiful photos!
I love your photography! These beignets look fabulous 🙂
May I just say, your blog is a little piece of sunshine. Doing some volunteer work in Africa and some friends here suggested your site for your Magic Middle cookies, which are now officially our favourite cookies of all time. Would love to try this recipe for a brunch we’re doing with other volunteers next weekend, but we don’t have access to bread flour here. I fear I already know the answer to this, but do you think regular white flour would work at all? Thanks! (I’ll probably search your site for a few more brunch options…sorry if I have to bother you with more questions later!)
Thanks so much! I’m so glad you guys enjoyed the cookies, they are definitely my favorites as well. As for the beignets, I think you’ll be fine using regular flour. Bread flour has more protein than normal flour, but otherwise there’s not a huge difference between bread flour and AP flour. Bread flour can take more liquid than AP flour, so you may want to reduce the amount of water by a few tablespoons or you can just add more flour until the dough isn’t too sticky.
And don’t worry about asking questions, I don’t mind at all! 🙂
I just made beignets for the first time with your recipe. I’d never had them before, nor have I ever tried baking. Thank you, thank you, thank you for your helpful tips. They’re surprisingly super easy, and (not surprisingly) super yummy.
Quick question for you:
I’ve never been very neat at filling/folding/crimping, etc. Any tips on how to get them to look as good as they taste? The ones in your pictures still look remarkably square with clean edges. Mine are a little lumpy all around, and nowhere near square-like.
This is so great to hear, Alex! I’m so glad you tried the recipe and that the beignets turned out so well. 🙂
As for how they look, beignets aren’t really supposed to look pretty (at least not any I’ve ever had), so you shouldn’t worry about it too much. I used a ruler to make sure I was cutting the dough into straight-edged squares. The ones without filling look nicer since you don’t need to do anything other than that. I definitely had an issue with my filled beignets being kinda lumpy, too! I just tried to fold the edges as straight as possible. It’s more important to make sure those are closed tightly so I think that sacrifices some of the visual appeal. But in my experience, once you cover them in powdered sugar you can’t even tell if they’re lumpy!
I found that it’s easier to line up the edges of the two pieces of dough and use a fork to pinch them together. It’s effective it you do it right, and it still looks super cute after it’s done frying.
Ohh, that’s a great tip, Alana! I will definitely try that next time. Thanks for letting me know!
Hello…wait…where am I??..thought I died and gone to heaven! Oh my Emily my stomach thanks you, my hips not so much! My hubby just wants to marry you…lol!! Thanks for sharing!
This Thing looks good but today we had beignets that are creme filled with banana creme.