Back to the Cutting Board

Individual Chicken Pot Pies
from Back to the Cutting Board, based on recipes from WeightWatchers.com [1] and How to Cook Everything [2] by Mark Bittman
Dinner | Servings: 2-4
Prep time: 25 min | Cook time: 20 min | Total time: 45 min
Ingredients
Filling
- 1 tbsp. butter
- 3/4 lb. uncooked boneless, skinless chicken breast, cubed
- 2 celery stalks, chopped
- 2 large carrots, chopped
- 1 large onion, chopped
- 3 sprigs of thyme (optional)
- 2 tbsp. self-rising flour (you can make self-rising flour [3] if you don’t have any)
- 1 cup low-sodium chicken broth
- 1/2 cup white wine (replace with more chicken broth if you don’t have any or don’t want to use wine)
- 1/3 cup frozen peas
- 1/3 cup frozen corn
- 1 tsp. chopped fresh thyme or 1/2 tsp. dried thyme
- 1/4 tsp. black pepper
- 1/2 tsp. salt
Topping
- 1 cup all-purpose or cake flour (I prefer to use cake flour because you get a lighter, less dense texture, but I’ve made it with AP and it’s still good)
- 1/2 tsp. salt
- 1 1/2 tsp. baking powder
- 1/2 tsp. baking soda
- 3 tbsp. cold butter, cut up into small cubes
- 1/4 cup + 3 tbsp. low-fat plain yogurt or buttermilk (I always use 2% Greek yogurt)
Process
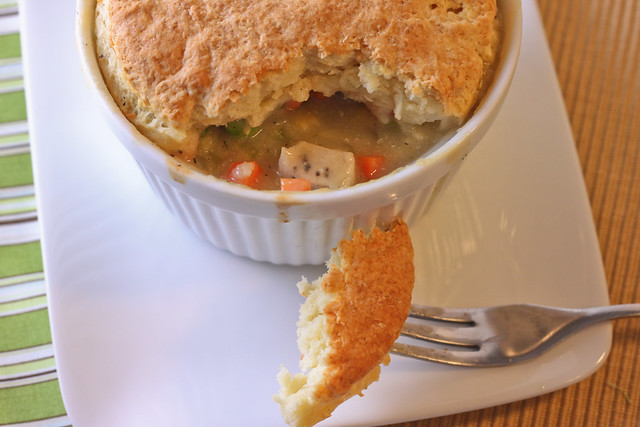
- Preheat oven to 375 degrees (F). Coat four 10 oz. or two 20 oz. (that’s what is pictured) ramekins with cooking spray (or a 9×9 pan if you don’t want to do individual pot pies).
- In a large pan, melt butter over medium heat. Add chicken, onion, celery, carrots and sprigs of thyme. Saute until chicken is no longer pink. Remove sprigs of thyme and discard.
- Add flour and stir so that it mixes with butter and becomes more like a paste.
- Slowly pour in chicken stock and wine, stirring constantly so no lumps form. Add peas, corn, chopped thyme, salt and pepper. Bring to a boil. Simmer until thick, about 15 minutes.
- While the filling is simmering make the biscuits. Mix the flour, baking powder, baking soda and salt in a large bowl (or food processor).
- Cut the butter into the flour mixture either by hand or food processor. I do it manually by picking up some of the flour mixture between my fingertips and rubbing it with a cube of butter. Then repeat until all the butter has been thoroughly blended. It should be crumbly, but well incorporated.
- Stir in the yogurt until the mixture forms a ball.
- Turn the dough onto a lightly floured surface and knead 10 times, no more. Add a little flour if it’s very sticky, but not too much, it should slightly stick to your hands.
-

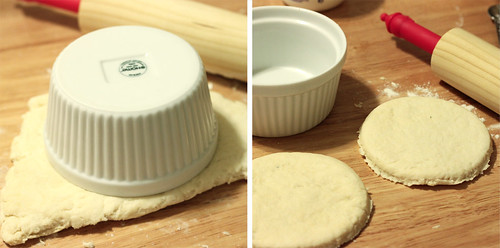
Press/roll the dough into 1/2 in. thick rectangle. Take one of your ramekins and use it like a biscuit cutter to cut out the exact size you need. Repeat for each ramekin you have. Set rounds aside.
Note: If you have any extra dough left cut into smaller biscuits, you can bake them along with the pot pies, just take them out after about half the baking time since they will cook faster.
- When your filling has thickened, pour evenly into each ramekin. Top with a biscuit round.
- Place ramekins on a baking sheet covered in foil (they tend to overflow, so that saves some clean up time) and bake for 15-20 minutes until the biscuits are golden brown and the mixture is bubbly.
